---
title: "R Shiny Part II"
subtitle: "Statistical Computing & Programming"
author: "Shawn Santo"
institute: ""
date: "06-10-20"
output:
xaringan::moon_reader:
css: "slides.css"
lib_dir: libs
nature:
highlightStyle: github
highlightLines: true
countIncrementalSlides: false
editor_options:
chunk_output_type: console
---
```{r include=FALSE}
knitr::opts_chunk$set(echo = TRUE, message = FALSE, warning = FALSE,
comment = "#>", highlight = TRUE,
fig.align = "center")
```
## Supplementary materials
Companion videos
- [R Shiny part 1 recap](https://warpwire.duke.edu/w/L9QDAA/)
- [Enhancing the UI](https://warpwire.duke.edu/w/N9QDAA/)
- [Enhancing the server function part 1](https://warpwire.duke.edu/w/Z9QDAA/)
- [Enhancing the server function part 2](https://warpwire.duke.edu/w/a9QDAA/)
Additional resources
- Shiny [reactivity](https://shiny.rstudio.com/articles/#reactivity)
- Shiny [code quality](https://shiny.rstudio.com/articles/#code-quality)
---
class: inverse, center, middle
# Recall
---
## What is Shiny?
.pull-left[
- Shiny is an R package.
- Build web-based apps with R in RStudio.
- Shiny can incorporate CSS themes and JavaScript actions.
]
.pull-right[

]
---
## How does Shiny work?

---
## How does Shiny work?

---
## How does Shiny work?

---
## Main components of Rshiny
.pull-left[
```{r eval=FALSE}
# Load package shiny
library(shiny)
# Define UI for application
ui <- fluidPage(
)
# Define server logic
server <- function(input, output) {
}
# Build and run the application
shinyApp(ui = ui, server = server)
```
]
.pull-right[
- Function `fluidPage()` creates a dynamic HTML user interface you see when you
look at an RShiny app. Convention is to save this as an object named `ui`.
- Function `server()` is user-defined and contains R commands your computer
or external server need to run the app.
- Function `shinyApp()` builds the app based on the user interface and
server pair of code.
]
---
## User interface review
- Build the user interface inside function `fluidPage()` and save it
as an object named `ui`.
- Function `fluidPage()` scales its components in real-time to fill all
available browser width - dynamic HTML user interface.
- Build inputs with `*Input(inputId, label, ...)`.
- Build outputs with `*Output(outputId, ...)`.
- Separate multiple inputs and outputs with commas.
- Run your app after each added input or output to minimize complications
later on.
---
## Function `server()` review
- The server function does the work in terms of building and rebuilding R
objects.
- Save output you build to `output$`.
- Build output with a `render*()` function.
- Access inputs with `input$`.
- Multiple outputs can be placed in the server function.
- Reactivity happens automatically when you use inputs to build rendered
outputs.
---
class: inverse, center, middle
# UI Layouts
---
## Layouts
- Use layout functions to position elements in your app.
- Use panels to group elements into a single unit for aesthetic or
functional purposes.
- Design your own layout or use a packaged layout.
---
## Rows with `fluidRow()`
```{r eval=FALSE}
ui <- fluidPage(
fluidRow(
# add inputs/outputs to row 1
),
fluidRow(
# add inputs/outputs to row 2
),
fluidRow(
# add inputs/outputs to row 3
)
)
```
---
## Rows and columns
```{r eval=FALSE}
ui <- fluidPage(
fluidRow(
column(width = 5,
# add inputs/outputs
# column width 5
),
column(width = 7,
# add inputs/outputs
# column width 7
)
),
fluidRow(
column(width = 8, offset = 2,
# add inputs/outputs
# 2 units in from left
)
)
)
```
---
## Rows and columns example
.small[
```{r eval=FALSE}
ui <- fluidPage(
fluidRow(
column(width = 5,
passwordInput(inputId = "pass",
label = "Enter password:"),
actionButton(inputId = "passbtn",
label = "Submit password")
),
column(width = 7,
paste("Add some description in row 1",
"of the column with a width of 7",
"here...", sep = " ")
)
),
fluidRow(
column(width = 8, offset = 2,
checkboxGroupInput(inputId = "checks",
label = "",
choices = c("Choice 1",
"Choice 2",
"Choice 3",
"Choice 4")),
"Add some more text in Row 2 here..."
)
)
)
```
]
---
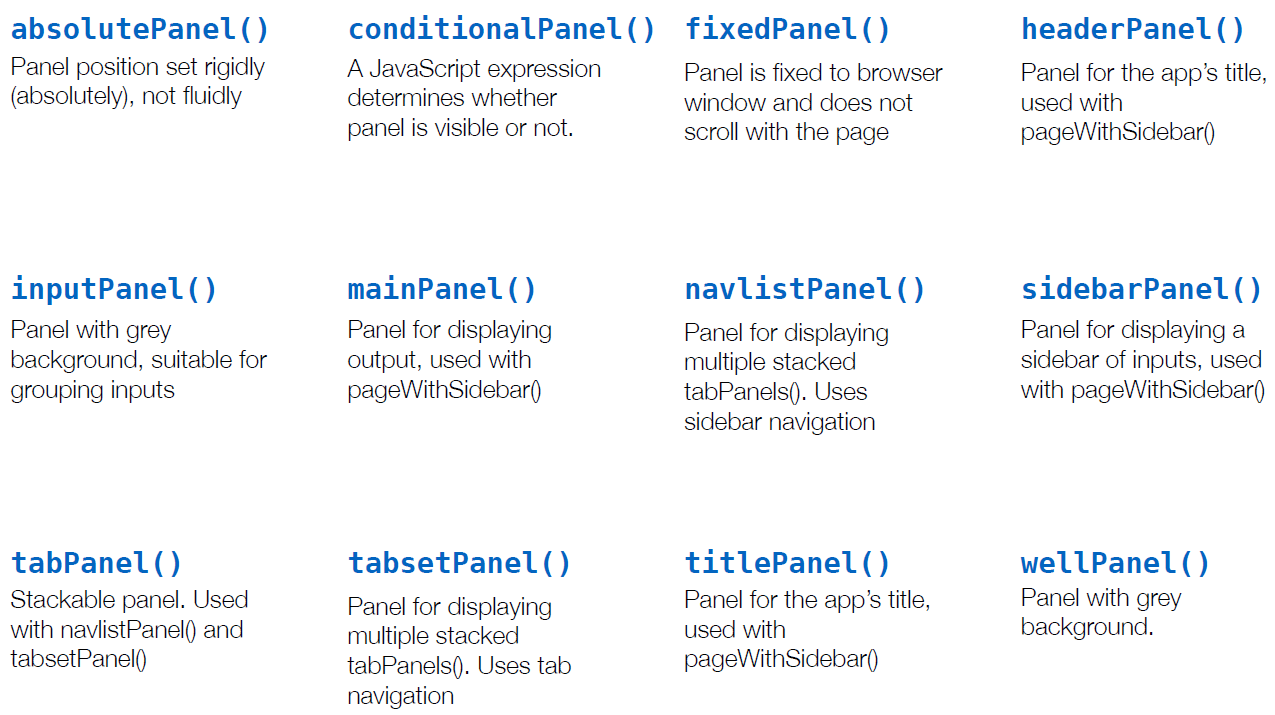
## Panels
---
## Packaged layout: `sidebarLayout()`
.pull-left[
.tiny[
```{r eval=FALSE}
ui <- fluidPage(
# give a title in quotes
titlePanel(),
sidebarLayout(
sidebarPanel(
# inputs/outputs
),
mainPanel(
# inputs/outputs
)
)
)
```
]
]
.pull-right[

]
---
## Packaged layout: `navbarPage()`
.pull-left[
.tiny[
```{r eval=FALSE}
ui <- fluidPage(
navbarPage(title = "Navigation Bar Layout",
tabPanel("Tab 1",
# add inputs/outputs
),
tabPanel("Tab 2",
# add inputs/outputs
),
tabPanel("Tab 3",
# add inputs/outputs
),
tabPanel("Tab 4",
# add inputs/outputs
)
)
)
```
]
]
.pull-right[

]
---
## Layout recap
- Use `fluidRow()` to arrange elements in rows; use columns() to
arrange elements in columns, where total width is 12
- Use `sidebarPanel()` and `mainPanel()` to partition app with the packaged
layout function sidebarLayout()
- Use `tabPanel()` with packaged layouts `navbarPage()` or `navbarMenu()`.
---
class: inverse, center, middle
# Reactivity
---
## Frequency of code execution
- Shiny will run the whole script the first time your app is launched.
- Each time a new user visits your app, Shiny runs the server function
again, one time.
- As users interact with widgets, Shiny will re-run the corresponding R
expressions that depend on a widget whose value was changed.
---
## Consider the simple app
.pull-left[
.tiny[
```{r eval=FALSE}
library(shiny)
library(tidyverse)
# Build UI
ui <- fluidPage(
textInput(inputId = "title",
label = "Enter a title"),
numericInput(inputId = "num",
label = "Number of variables",
value = 100,
min = 1),
plotOutput(outputId = "hist")
)
# Define server function
server <- function(input, output) {
output$hist <- renderPlot({
ggplot(as_tibble(rexp(input$num)),
aes(x = value)) +
geom_histogram(bins = 10) +
labs(title = input$title)
})
}
# Run the application
shinyApp(ui = ui, server = server)
```
]
]
.pull-right[

]
---
## Is there a problem?
.pull-left[
.tiny[
```{r eval=FALSE}
library(shiny)
library(tidyverse)
# Build UI
ui <- fluidPage(
textInput(inputId = "title",
label = "Enter a title"),
numericInput(inputId = "num",
label = "Number of variables",
value = 100,
min = 1),
plotOutput(outputId = "hist")
)
# Define server function
server <- function(input, output) {
output$hist <- renderPlot({
ggplot(as_tibble(rexp(input$num)),
aes(x = value)) +
geom_histogram(bins = 10) +
labs(title = input$title)
})
}
# Run the application
shinyApp(ui = ui, server = server)
```
]
]
.pull-right[
- Every time you change the title, `labs(title = input$title)` new random
numbers will be generated. If a single input changes in a block of code
inside a render function, then the entire block of code is re-run.
- This is very inefficient and can cause problems.
]
---
## Attempted solution
.pull-left[
.tiny[
```{r eval=FALSE}
library(shiny)
library(tidyverse)
# Build UI
ui <- fluidPage(
textInput(inputId = "title",
label = "Enter a title"),
numericInput(inputId = "num",
label = "Number of variables",
value = 100,
min = 1),
plotOutput(outputId = "hist")
)
# Define server function
server <- function(input, output) {
data <- rexp(input$num)
output$hist <- renderPlot({
ggplot(as_tibble(data),
aes(x = value)) +
geom_histogram(bins = 10) +
labs(title = input$title)
})
}
# Run the application
shinyApp(ui = ui, server = server)
```
]
]
.pull-right[
```r
Error in .getReactiveEnvironment()$currentContext():
Operation not allowed without
an active reactive context.
(You tried to do something that can
only be done from inside a reactive
expression or observer.)
```
- Reactive inputs must be in a reactive-type function.
]
---
## Reactive expressions
The render functions are reactive-type functions. Function `reactive()`
builds a reactive object. The object will respond to every
reactive source in the code.
Rather than
```{r eval=FALSE}
data <- rexp(input$num)
```
use
```{r eval=FALSE}
data <- reactive({rexp(input$num)})
```
--
A reactive expression has two special properties:
1. call a reactive expression like a function, `data()`;
2. reactive expressions cache their values, the value is retained until
it becomes invalidated.
---
## Solution
.tiny[
```{r eval=FALSE}
library(shiny)
library(tidyverse)
# Build UI
ui <- fluidPage(
textInput(inputId = "title",
label = "Enter a title"),
numericInput(inputId = "num",
label = "Number of variables",
value = 100,
min = 1),
plotOutput(outputId = "hist")
)
# Define server function
server <- function(input, output) {
data <- reative({rexp(input$num)})
output$hist <- renderPlot({
ggplot(as_tibble(data()),
aes(x = value)) +
geom_histogram(bins = 10) +
labs(title = input$title)
})
}
# Run the application
shinyApp(ui = ui, server = server)
```
]
---
## Complementary functions for reactivity
| Function | Purpose |
|------------------:|:---------------------------------------|
| `isolate()` | prevent reactions |
| `observeEvent()` | trigger code, useful for action button |
| `observe()` | similar to `observeEvent()` |
| `eventReactive()` | delay reactions |
---
class: inverse, center, middle
# Dynamic UI
---
## Dynamic interface
Shiny offers four main approaches to build a dynamic UI:
1. Function `conditionalPanel()`: wraps UI elements, does require very
very minimal JavaScript knowledge
2. Function `renderUI()`: use in `server()` in conjunction with the
`uiOutput()` function in `ui`, lets you generate calls to UI functions
and make the results appear in a predetermined place in the UI.
3. Functions `insertUI()` and `removeUI()`: allow you to add or remove pieces
of UI code
4. Use JavaScript directly
---
## References
- Shiny. (2019). Shiny.rstudio.com. https://shiny.rstudio.com/